The American Made Show - Washington DC

Exhibiting at a trade show was high on my list of goals for 2016. In fact, I spent a great deal of 2015 preparing for it. The American Made Show at the convention center in Washington, DC was my first trade show experience, and now that I've had time to process everything, I thought I'd share some personal insights. 

First thing's first: a trade show is NOT a craft show. I have done many a craft show in the last few years, which was valuable experience, but the trade show was a whole new ball game. Each exhibitor is essentially setting up a temporary store, and the attendees are not looking for fun little Christmas gifts for their friends - they're buyers for boutiques, or sourcing products for a catalog. 

I have been wholesaling for a few years, but never in person. I already felt confident in my jewelry line, it's a great product that does well in the stores that carry it, so I felt it was time to get out there and be proactive. A trade show is a great place to be found!

OnceAgainSam5624.jpg

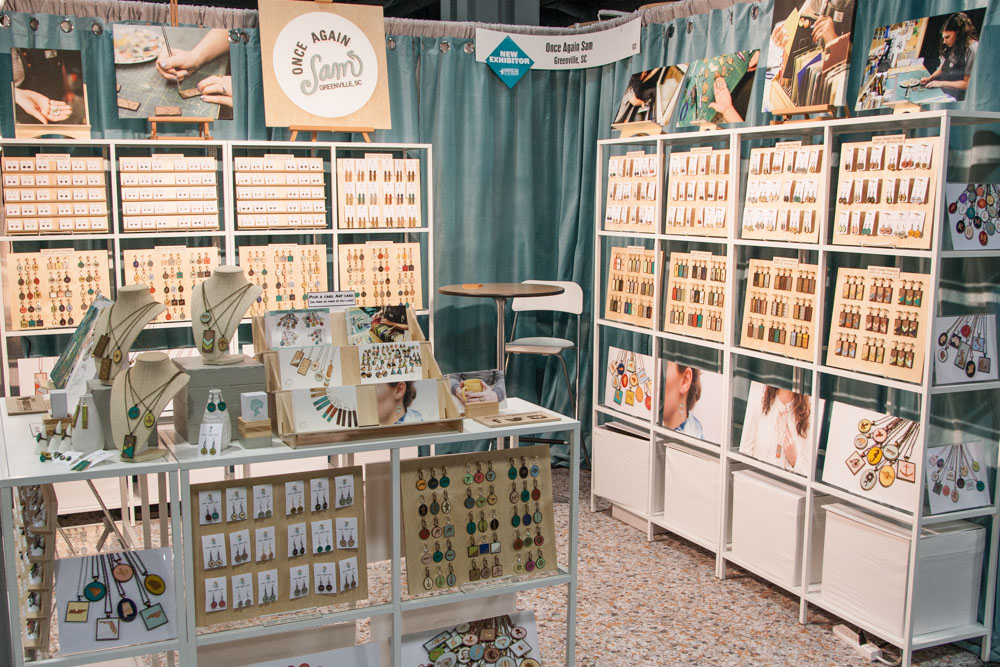
Taking on the tradeshow challenge, I started designing my booth (and budgeting for it) nine months before the event. My background in commercial interior design came in handy - I used a drafting program to draw everything to scale because I knew I wouldn't be able to do a full mock up (the booth was 10' x 10', and my foyer just isn't big enough for that). My booth color palette reflected my branding, and the materials were all thought out in great detail. 

I decided not to rent anything from the show other than lighting, because I intend to exhibit at future tradeshows so it made sense to invest in my own furnishings and displays. The shelving I chose was purchased at Ikea, and it easily comes apart for transportation purposes. The velvet drapes in the background were also from Ikea, and had to be treated with fire retardant to meet code. The carpet tile was donated by Milliken (it's the same carpet that's in my studio), and got a lot compliments throughout the show. 

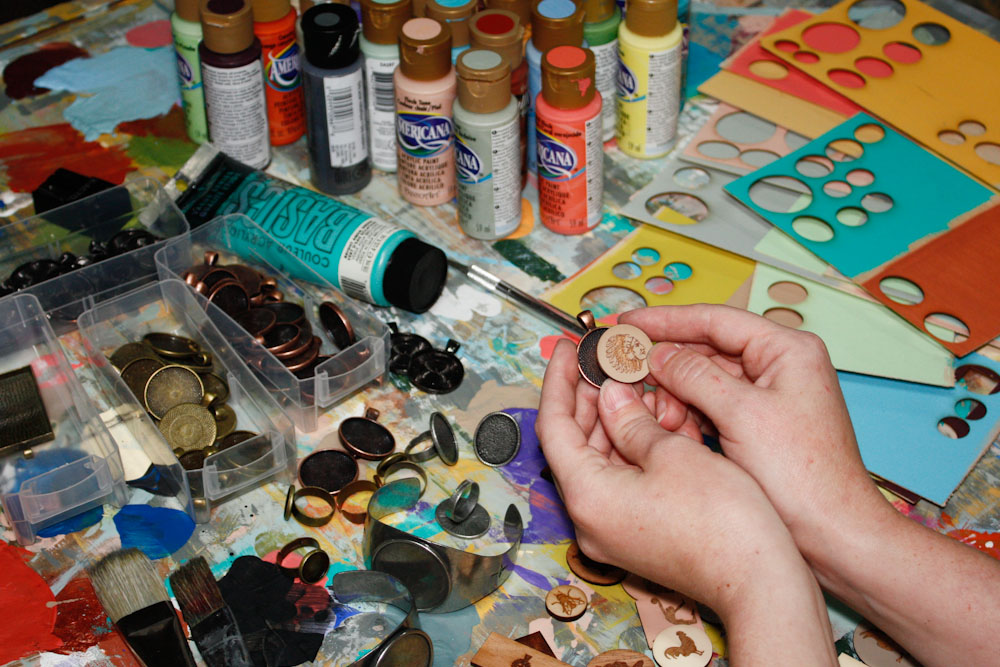
My favorite element is the plywood displays. I designed & dimensioned drawings for each one, then my handy husband fabricated all of the 20 panels from Baltic birch plywood. Each panel is perfectly suited to display the various jewelry items (pendants, rings, earrings, etc.).

OnceAgainSam5100.jpg

In addition to planning the booth months ahead of time, I also began the very tedious process of creating my very first catalog. I'm a DIY kinda gal, I enjoy photography, graphic design, organizing things, and so forth, but this catalog kicked my butt.  Developing the SKU's REALLY kicked my butt. Even though I limited the catalog to my popular Curious Cameos line, it was still a massive amount of inventory to make, photograph, layout, and assign SKU's in a system that would make some sort of sense. With the help of my handy husband once again, the catalog looks amazing, and I really felt proud to hand them out to potential buyers at the show.

Although I had nothing to compare this tradeshow to, since it was my first rodeo, so to speak, I was very pleased with the orders I took, the contacts I made, and everything I learned during the process. Now that I've gotten my feet wet, I'm itching to do this again. Good thing the American Made show is coming to Greenville this summer. You know I'll be there!

If you've been keeping up with my blog, you know I'm very open about my business, and it's all because I want to help others. If you're considering trying a tradeshow, and have questions, shoot me an email and I'll be happy to share what I learned and talk specifics. 

Oh! I almost forgot - what's the one thing at the end of the day that can make you forget all about your sore feet and a sore smile? Good food (and drink), of course! We ate some AMAZING meals in and around Chinatown. If you're ever visiting, I highly recommend these restaurants. In fact, make sure you're visit is long enough that you can try them all! 

Cuba Libre (Cuban): try the classic caipirinha, malanga fritters, papas rellenas, lechon asado, arroz con pollo. This place was so good, we ate there twice during our 5 day visit.

Nando's Peri Peri (Portuguese): start with a glass of sangria, then go for some hummus, grilled chicken, mashed peas with chili and mint, and red potatoes. 

Acadiana (Contemporary Louisiana): definitely order a mint julep, BBQ shrimp with bread, and friend green tomatoes. 

Silo (New American): cider, butternut squash soup, grilled brussels sprouts, roasted chicken with snow peas. 


Books Books Books (My 2015 Goodreads Challenge)

I'm a little late posting this, but I finally curled up with a cup of tea and my Goodreads dashboard this morning to see how I did in 2015, rather than finishing either of the two books I'm currently halfway through. I didn't meet my Goodreads challenge for last year (which was 35 books), but I really enjoyed just about everything I read. The majority of the books I spent my time with were fiction, and I'd say over 75% of them were audible books (my favorite way to read while I'm at work in the studio!)

Below is my Year in Books. I couldn't decide on a favorite this time. It's a tie between Althea & Oliver, and My Heart and Other Black Holes. Both VERY good, and I'd definitely read them again in the future. 

For 2016, I'm setting my goal at 24 books. I feel like 2 books per month should be doable, so we'll see how it goes! What are you planning to read this year? I'd love some recommendations if you have any.

If we're not already connected on Goodreads, lets change that! Find me here

Year in Review: 2015

I know I say this every year, (and I hope I’ll be lucky enough to get to say it again next year): this has been an incredible twelve months. Once again, records have been broken, goals have been achieved (though promptly replaced by new goals for next year), and an awful lot of fun has been had. I've learned SO much this year, and there are some big big things coming up in the near future. As always, I feel incredibly blessed to be able to make a living this way, with my own two hands as a creative entrepreneur, and I'm so thankful for every minute of this journey as a Maker.

Once Again Sam turns 7 years old on January 8th, and as I have done in past years, I always like to stop and reflect, think through what I’ve learned, where I’ve been, and the countless things I have to be grateful for.  

Just a reminder of why I share my stats - this is not intended for bragging purposes.

  • This is to show that a little side hobby can become a serious business over time, through trial and error, self education, and a whole lot of hard work.

  • This is to encourage others to start something of their own, or keep at it, whatever stage they're in. If you have idea for a business, go for it! I had no plan when I started out, so if you have that much, you're way ahead of me. 

  • This is because a record breaking year is only possible thanks to God’s provision, and support from everyone out there who has been a part of my business in some way.

Thank you all for your support this year!

2015 Graphic.jpg

It was a darn good year, in more ways that numbers can ever prove. Here’s ten of my favorite highlights from 2015, in no particular order. This is what memory lane looks like as a small business owner.

  1. Workshop renovations: Thanks to my husband and all his hard work renovating our basement this year, I now I have a workspace where I’m happy and incredibly productive. Also, it’s a total luxury to be able to run equipment, filter the air, AND have the lights on all at once without blowing a circuit!

  2. The Makers Summit: as always, this conference for creatives lit a fire under me to take on some big big goals this year, and I’m proud to say I have checked off almost everything on this year’s list (or very close to it). However, I already have a to-do list for 2016, and the next conference is still 2 months away!

  3. Artisphere: Getting accepted to the festival and winning the People’s Choice Award was a huge honor, and even though I didn’t make the cut for 2016, that gigantic purple prize ribbon will always hang proudly in my studio.

  4. New laser cutter: I upgraded to a huge 90 watt machine this year, and it was worth every penny. I only wish I had done it sooner and never wasted my time on a cheaper hobby model when I needed the professional model from the start. I’ll never forget how relieved I was when we finally got this thing in place (it weighs over 500 pounds and nearly didn’t fit through the doorway)!

  5. Learning new things (woodturning,  metal working, shibori dying): In February I took a woodturning class with my husband, and after an afternoon of instruction, we’ve been hooked ever since. I also attended the John C. Campbell Folk School for a week this summer to learn metal smithing, which was an incredible learning experience. Recently, I tried my hand at shibori dying, just for fun, and really enjoyed the process. I now realize for the first time how important learning new things is for my creative health, so that’ll definitely be a priority for next year.

  6. American Made Finalist: I have applied to this national contest for years, and was excited to make it to the final round for the first time. I got some nice media exposure because of it, even though I didn’t win.  

  7. My first catalog: It took over 6 months of tedious, frustrating, never-ending work, but we did it! Oh my gosh, never again. But yay, it’s finally done!

  8. Indie Craft Parade: I look forward to this craft show all year long for so many reasons, and it never ever disappoints. Is it weird I’m already thinking about my application photos for June?

  9. The Bunny Project: The idea for this series began about this time last year, and once every quarter, I took a break from orders and production work to make something just for fun. In my world, making bunnies is fun. Making bunnies doing or wearing ridiculous things, is about as much fun as a person can have. 95% of the pieces from this quirky needle felted collection sold, so that was an unexpected bonus. I guess I’m not the only one who LOVES bunnies!

  10. Starting the #MakersEyeView series: I got the GoPro camera for Christmas last year, and have really enjoyed producing these short videos for my YouTube channel that share my process (from my perspective, mostly as time-lapse). I didn’t have any video background prior to this, and still have an awful lot of technical stuff to learn, but I have discovered I really enjoy sharing what goes on behind the scenes in the studio, and I have been overjoyed by the positive response so far.   


Tour My Workspace(s)

My work is a huge part of my life, and my home is where I work. The spaces in which I create are linked to my ability to get work done, be inspired to try new things, and ultimately make a living. Working from home is ideal for me, because I can bounce around from making leather earrings, to needle felting, to laser cutting wooden pendants, to photographing new products, all without having to go anywhere. A lot can be accomplished in just one day!  

Today, I’m inviting you on a virtual tour of my many workspaces. Each room is home to a different part of my process, and is the birthplace of a variety of handmade items. When you make a living making things, it can change your whole lifestyle, and your home ends up becoming more than just a place to live.

Come on in, welcome to my home!

The Workshop: this is the first stop on the tour because it’s where my husband / operations manager and I have spent the most time renovating and improving lately (lighting, ductwork, wood paneling, etc.). The unfinished basement is about 900 square feet and is where a lot of production work occurs. All the things that make big messes (like the lathe, sanders, saws, laser cutter, etc.) live down here.

The Laser Room: In an 8x10 side room, a room that was once used as a children’s play area when we hosted a Bible study / small group a few years ago, is now the the “laser room”. I recently upgraded my 40 watt hobby laser cutter to a humongous and awesomely powerful 90 watt pro model. It’s pretty friggin’ cool! We could barely move this new machine into the house, it cost as much as a used car, and requires serious ventilation, but it was well worth it. My jewelry designs (done in Illustrator or AutoCad) are intricate, but the laser can handle it. I could never dream of doing these cuts successfully by hand, so by adding this high tech tool, I’m able to remake my designs over and over, which allows me to do large orders and keep my prices reasonable. Having a machine like this changed my whole business model several years ago when I took the plunge and bought the original laser. In this room, I also keep some leather, wood, and tons of supplies. We’ve got a small tabletop CNC router on order so that will be a welcome addition very soon.  

* Favorite things about this space: the workbench with “paint store” that my handy husband built for me, and my way-cool splatter paint carpet that’s fun and light, but hides everything (because let’s face it, it’s not clean, and some of those paint splatters are actually paint splatters).

The Studio: From the basement workshop, walk up two flights of stairs and you’ll find my studio. This is the room where final assembly, finishing touches, photography, and packing orders occurs. All of the hand-cut leather jewelry is made here, since I still have have a number of designs that use basic hand tools rather than high tech machines. In the closet, there’s shipping supplies and about a dozen articles of clothing. Not my clothes. Clothes I got at thrift stores and intend to chop to pieces and turn into jewelry. I love to repurpose leather and will buy just about anything, as long as the color is right.

* Favorite things about this space: My “leather drawers” ;-) The leather scraps in these drawers are organized by color, and I get inspired just by looking at all the bits and pieces and all the possibilities they bring.

The Office: Go back down one flight of stairs, and you’re in the office. It’s funny, the workshop, studio, and office are all in the same exact corner of the house, so the views are identical, just at different levels. The office is shared with my husband who works from home, and is where I do all of my correspondence, Etsy shop maintenance, photo & video editing, blogging, and accounting. Since I don’t have a physical brick & mortar store, and in-person craft shows are only seasonal, I end up doing the majority of my business from this spot in the house.

* Favorite things about this space: being near my husband. We “bother” each other a lot, but it’s actually a huge blessing. There was a time back when we lived in the DC metro area when we only saw each other about 2-3 hours a day during the week. It sucked. We have a completely different lifestyle now and I wouldn’t trade it for anything. Also, his title of “Operations Manager” is 100% accurate - he keeps the biz up and running, so it’s nice having him nearby.

The Couch:  Not kidding! I spend several hours a day needle felting on the couch with some sort of nature documentary, depressing indie film, or audio book going in the background. The living room may pass for fairly normal at first glance, but if you look closer (like in the bins under the couch, the basket under the end table, in that dark wicker hamper sitting discreetly in the corner), you’ll notice there’s a whole flocks’ worth of sheep’s wool all around you. I have my roving in containers organized by color, so it’s easy to find what I need. Besides (a lot of) wool fiber, there’s really not much else needed for needle felting. I have a 2” thick foam pad that sits on my lap while I felt, a variety of needles, plus a portable work light, and that’s about it.   

* Favorite things about this space: being able to learn something new / think about something else unrelated to my work, while I work. My hands may be felting, but at the same time I can be learning all about the Altiplano in South America and the fascinating flamingos that call it home, or reading / listening to The Electric Michelangelo by Sarah Hall for the 50th time.

So there you have it. The spaces where everything is handmade, by me, under one roof!

GreenCraft: Making an Upcycled Suede Necklace

It's an honor to have my suede fringe necklace featured in this month's GreenCraft Magazine! This is one of my favorite jewelry projects to make, and it's a great way to use up a variety of miscellaneous suede and leather scraps (which I happen to have a lot of around the studio). My whole handmade jewelry business Once Again Sam is centered around using recycled materials, and leather has always been the most dear to me. I enjoy searching for outdated suede clothing at the thrift store, and giving it new life, once again, in a whole new way as bold but wearable jewelry. 

Below is a step by step tutorial on how to make the statement necklace shown in the GreenCraft article, as well as a #MakersEyeView sharing a time-lapse video of the process from start to finish. Enjoy, and happy crafting!

How to make a suede fringe necklace: 

1. Gather material: I use thrift store clothing as my suede and leather source, but just about anything will work as long as it doesn't fray when cut. 

2. Cut strips: use scissors to cut an assortment of 1/4" wide strips (the length is up to you, mine are about 2 1/2 to 3"). The necklace in the photo used over 150 pieces total, in 20 different colors. 

3. Create pointed ends: give one end of each piece a pointed shape, so they'll have that "fringe" look when strung together. They don't have to be perfect!

4. Punch holes: use an 1/8" circle leather punch to punch a small hole through the top of each piece (the flat end, not the end with the point).

5. Make your chain: cut a length of thin chain around 18-20" (depending on where you want the necklace to lay on your chest), then add a clasp to one end so the leather pieces wont fall off once you begin stringing them on. The chain needs to be thin enough to go through the punched holes. I attached a needle to the end of my chain to make threading easier, because my punched hole was just barely big enough to accept the chain.

6. Start stringing: once you have your colors in the order you want them, begin adding your suede strips one by one until you're happy with the overall size.

GreenCraft has featured two of my upcycled jewelry projects in the past, and those tutorials can also be found on my blog:

Click HERE for suede fringe earring project

Click HERE for suede cuff project